固件烧录
注意:此固件处于测试阶段,可能会存在一些bug,推荐有一定技术能力的用户使用。
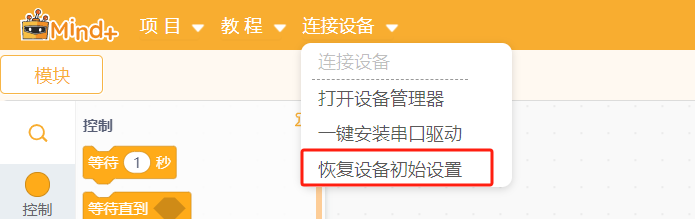
注意:烧录micropython固件后,要想再使用Mind+中的图形化模式,需要在Mind+ V1中恢复初始设置
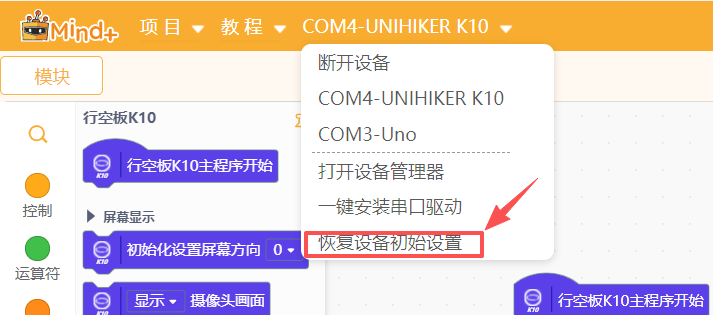
或在Mind+ V2中连接K10后点击擦除
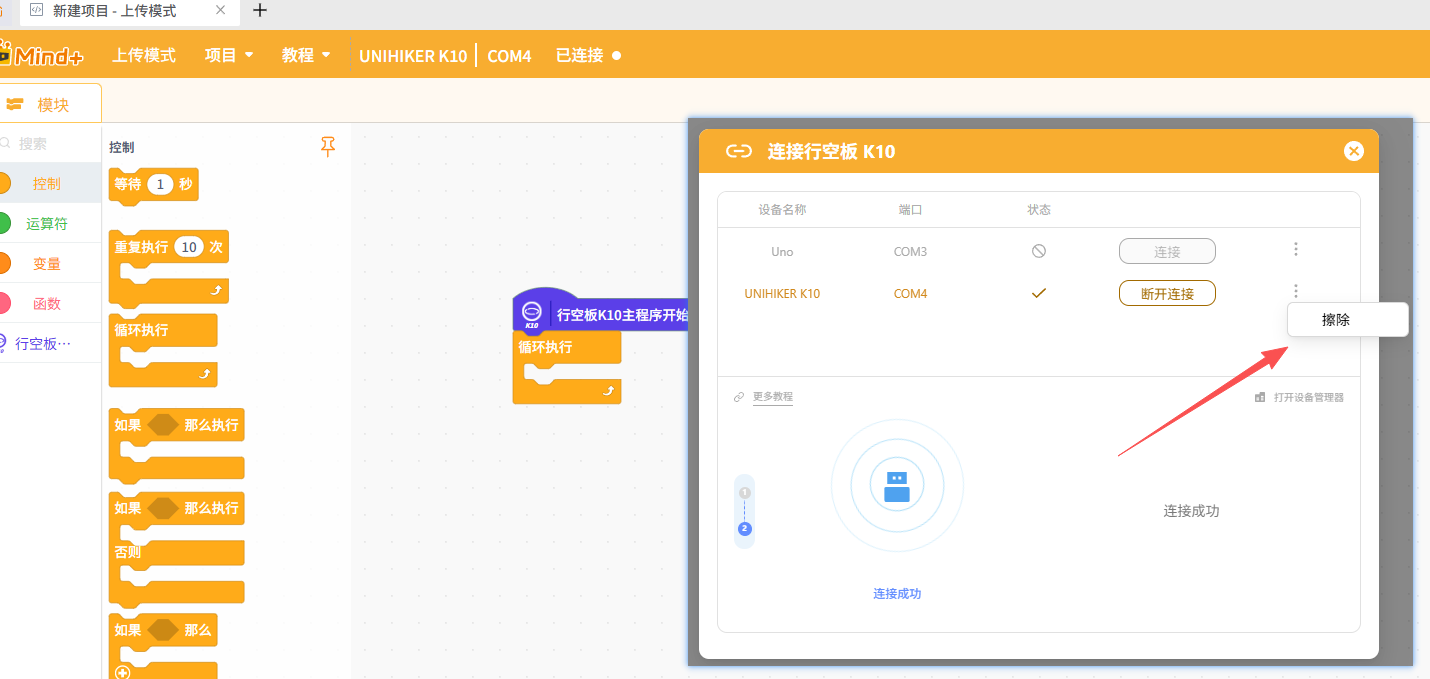
恢复时先按住boot,再接数据线,待识别出端口后即可松开BOOT键,此时再点击恢复初始设置。完成后摁下板子的RST复位即可完成恢复
烧录方法1
-
下载Mind+ V2: 点击下载Mind+ V2
-
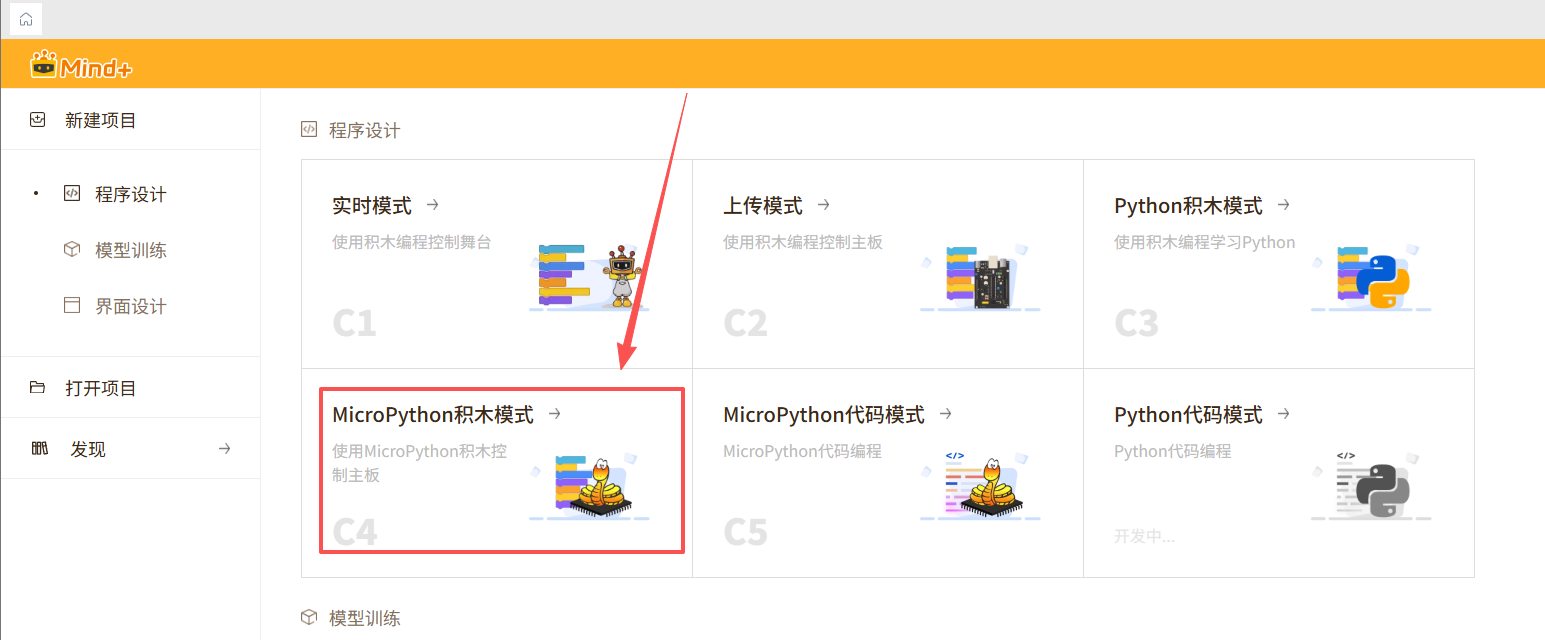
选择MicroPython积木模式
-
左下角扩展选中0.0.5版本(或以上)的行空板K10并安装

烧录方法2
-
下载micropython固件:micropython_unihiker_k10&Box_20260430_V0.9.8.zip
-
下载ESP32固件烧录软件:点击下载
-
解压后运行exe文件,选择ESP32-S3。

-
选择对应的文件,填入相应地址,并勾选最前面的对号。

-
按住行空板K10背面的BOOT按钮,连接板子与电脑,在软件中选择对应的端口。
-
先点击“ERASE”清除flsh,待成功后再点击"START"进行烧录。
-
烧录完成后摁下行空板K10板子的RST复位键。
软件准备
-
下载并安装Thonny
-
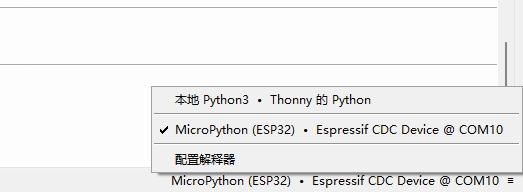
安装完成后打开软件,软件右下角选择ESP32
-
点击左上角新建文件,输入代码

-
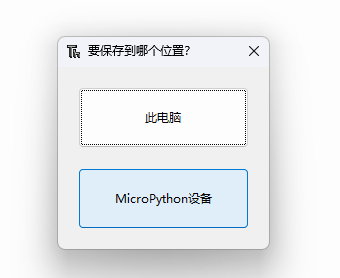
CTRL+S保存到micropython设备。选择保存到此电脑也可以,若选择保存到此电脑,则程序未保存到板子中,重启板子后程序会丢失,测试阶段适合保存到电脑中。
-
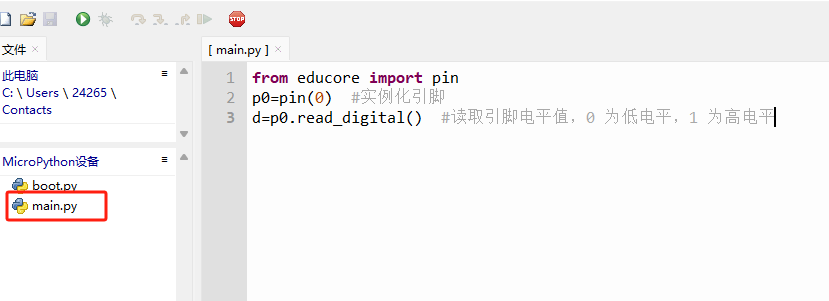
保存文件命名为main.py。
-
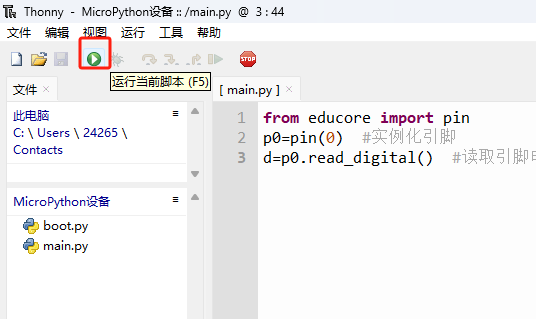
点击运行。
屏幕显示
显示摄像头画面
from unihiker_k10 import screen
import time
from k10_base import Camera

#初始化对象
camera = Camera() #增加

#初始化屏幕 设置方向为(0-3)
screen.init(dir=2)#代码中不调用时默认为2
camera.init()#初始化摄像头

#屏幕显示摄像头画面
screen.show_camera(camera)

while True:
    time.sleep(1)
显示图形
from unihiker_k10 import screen
import time
from k10_base import Camera

camera = Camera()
camera.init()
screen.init(dir=2)
screen.show_camera(camera)
screen.show_bg(color=0xFFFF00)
screen.set_width(width=5)
screen.draw_line(x0=0,y0=0,x1=80,y1=80,color=0x0000FF)
screen.draw_point(x=100,y=10,color=0xFF0000)
screen.draw_rect(x=120,y=100,w=80,h=120,bcolor=0xFF6666,fcolor=0x0000FF)
screen.draw_rect(x=120,y=100,w=40,h=60,bcolor=0x012345)
screen.draw_circle(x=80,y=80,r=40,bcolor=0x00FF00,fcolor=0x0000FF)
screen.draw_circle(x=80,y=80,r=20,bcolor=0xFF0000)
screen.draw_text(text="你好\n23",x=10,y=0,font_size=24,color=0xFF0000)
screen.draw_text(text="line\n456\nhgjh\n",line=2,font_size=24,color=0xFF0000)
screen.show_draw()
time.sleep(2)
screen.clear()

while True:
    time.sleep(1)
板载传感器
板载按钮(A/B按键)
from unihiker_k10 import button
import time
bt_a=button(button.a)#初始化板载按键传感器 A
bt_b=button(button.b)#初始化板载按键传感器 B

#当按键(A/B)(按下/松开)
def button_a_pressed():
    print("button_a_pressed")

def button_a_released():
    print("button_a_released")

def button_b_pressed():
    print("button_b_pressed")

def button_b_released():
    print("button_b_released")

bt_a.event_pressed = button_a_pressed
bt_a.event_released = button_a_released
bt_b.event_pressed = button_b_pressed
bt_b.event_released = button_b_released

while True:
    print("button_a.status=",bt_a.status())
    print("button_b.status=",bt_b.status())
    time.sleep(0.1)
    pass
板载温湿度
from unihiker_k10 import button,temp_humi,screen
import time

screen.init(dir=2)
screen.show_bg(color=0xFFFF00)

while True:
    temp_c = temp_humi.read_temp()
    temp_f = temp_humi.read_temp_f()
    humi = temp_humi.read_humi()
    print(temp_c)
    print(temp_f)
    print(humi)
    screen.draw_text(text="温度: "+str(temp_c)+" C",x=10,y=0,font_size=24,color=0xFF0000)
    screen.draw_text(text="温度: "+str(temp_f)+" f",x=10,y=20,font_size=24,color=0xFF0000)
    screen.draw_text(text="湿度: "+str(humi)+" %RH",x=10,y=40,font_size=24,color=0xFF0000)
    screen.show_draw()
    time.sleep(1)
板载环境光
from unihiker_k10 import light
import time
while True:
    print(light.read())
    time.sleep(0.1)
板载加速度传感器
from unihiker_k10 import acce
import time
#读取加速度的值(x/y/z)
while True:
    print("x=",acce.read_x())
    print("y=",acce.read_y())
    print("z=",acce.read_z())
    time.sleep(0.1)
板载RGB灯
from unihiker_k10 import rgb
import time
#灯号(0,1,2,全部)显示颜色()
rgb.write(num = 0,color=0x0000FF)#可以用-1或不传num代表全部

#灯号(0,1,2,全部)显示颜色R()G()B()
rgb.write(num = 0,R=255,G=0,B=0)

#关闭(全部,0,1,2)RGB
rgb.write(num = 0,color=0x000000)

#设置RGB亮度为(0-9)
rgb.brightness(9)
while True:
    rgb.write(color=0xFF00FF)
    time.sleep(1)
    rgb.write(num = 0, R=255,G=0,B=0)
    rgb.write(num = 1, R=0,G=255,B=0)
    rgb.write(num = 2, R=0,G=0,B=255)
    time.sleep(1)
    rgb.clear()
    time.sleep(1)
    rgb.write(num = 2, R=0,G=0,B=255)
    time.sleep(1)
    rgb.write(color=0x0000)
    time.sleep(1)
TF卡
from k10_base import TF_card
import os
tf_card = TF_card()
files = os.listdir("/sd")
print("Files in /sd:",files)
录放音
from unihiker_k10 import mic,speaker
import time
print("begin sys recode")
mic.recode_sys(name="sound.wav",time=5)
print("recode sys done")
time.sleep(1)
print("begin sys play")
speaker.play_sys_music("sound.wav")
print("end sys play")
time.sleep(1)
print("begin tf recode")
mic.recode_tf(name="sound.wav",time=5)
print("recode tf done")
time.sleep(1)
print("begin tf play")
speaker.play_tf_music("sound.wav")
print("end tf play")
while True:
    pass
通讯
WiFi
from k10_base import WiFi,MqttClient
wifi = WiFi()  #新增
wifi.connect(ssid="DFRobot-guest",psd="dfrobot@2017",timeout=50000) #尝试连接wifi网络。可以不写参数名称。timeout为可选参数,表示连接超时时长,默认超时时间为10000毫秒
wifi.status() #返回网络连接状态,True表示已连接,False表示未连接
wifi.info() #返回包含当前IP地址、子网掩码、网关等信息的字符串
MQTT
from k10_base import WiFi,MqttClient

import time

wifi.connect(ssid="DFRobot-guest",psd="dfrobot@2017",timeout=50000) #尝试连接wifi网络。可以不写参数名称。timeout为可选参数,表示连接超时时长,默认超时时间为10000毫秒
wifi.status() #返回网络连接状态,True表示已连接,False表示未连接
wifi.info() #返回包含当前IP地址、子网掩码、网关等信息的字符串

def received_1ffdf0jpLa():
    msg=mqttclient.message(topic='siot/test')
    print(msg)

mqttclient.connect(server= "192.168.9.172",
                   port=1883,
                   client_id="",
                   user= "siot" ,
                   psd= "dfrobot") #阻塞运行,默认超时时间为3秒
mqttclient.connected() #返回连接状态

#msg=mqttclient.message(topic='1ffdf0jpLa') #获取对应主题接收的消息,若该主题无消息,则返回None

mqttclient.received (topic='siot/test', #对应主题收到消息时,回调函数
                     callback=received_1ffdf0jpLa) #通过callback指定回调函数

while True:
    mqttclient.publish(topic='siot/test',content= 'hello')#向对应主题发送消息,content为发送内容
    time.sleep(3)
蓝牙HID
from unihiker_k10 import screen, hid, keycode,button
import time
bt_a=button(button.a)#初始化板载按键传感器 A
bt_b=button(button.b)#初始化板载按键传感器 B

ble_hid = hid(name='mpy_hid') #初始化蓝牙 HID 设备并命名为 mpy_hid
screen.init(dir = 2)
screen.show_bg(color=0xFFFF00)
screen.draw_text(text="ready",line=1,font_size=24,color=0xFF0000)
screen.show_draw()
while True:
    if ble_hid.isconnected():#判断是否已经连接,True 为连接,False 为未连接 非阻塞
        screen.draw_text(text="connect",line=1,font_size=24,color=0xFF0000)
        screen.show_draw()
    else:
        screen.draw_text(text="disconnect",line=1,font_size=24,color=0xFF0000)
        screen.show_draw()
    if bt_a.status() == 1:
        ble_hid.keyboard_send(keycode.SPACE) #模拟键盘按下空格
    if bt_b.status() == 1:
        ble_hid.keyboard_send([keycode.CTRL,keycode.a]) #按下组合键CTRL+a
    time.sleep(0.1)
AI相关
语音识别+语音合成
import asr
import time
#asr.ASR_MODE_SINGLE 单次
#asr.ASR_MODE_CONTINUOUS 连续
#asr.init_asr(6000,asr.ASR_MODE_SINGLE)#配置检测时间和识别模式
asr.init_asr()

def cb(data):
    if data == 1:
        asr.add_tts_data("灯光已打开")
    else:
        asr.add_tts_data("灯光已关闭")
    print("ID:", data)

#注册识别处理回调函数
asr.set_asr_callback(cb)
#启动语音识别
asr.start_asr()
#启动语音合成
asr.start_tts()
#设置命令词条
asr.add_asr_command(1,"kai deng")
asr.add_asr_command(2,"guan deng")
print("请说‘你好,小鑫’唤醒")
try:
    while(True):
        time.sleep(1)

except KeyboardInterrupt:
    print("\n捕获到 Ctrl+C 中断!")
    #释放语音识别资源
    asr.free_asr()
移动检测
import ai
import time
from unihiker_k10 import screen
import machine

#初始化ai
ai.init_ai()

#启动摄像头
ai.camera_start()

#启动移动检测
ai.move_detect()

screen.init()

try:
    while True:
        image_data = ai.camera_capture()
        screen.show_camera_img(image_data)
        if ai.is_ai_data_updated():
            data = ai.get_ai_data()
            print(f"Move: {data['move_flag']}")

        time.sleep_ms(1)

except KeyboardInterrupt:
    print("\n捕获到 Ctrl+C 中断!")
    ai.deinit_ai()
二维码识别
import ai
import time
from unihiker_k10 import screen
import machine

#初始化ai
ai.init_ai()

#启动摄像头
ai.camera_start()

#启动二维码识别
ai.code_scanner()

screen.init()

try:
    while True:
        image_data = ai.camera_capture()
        screen.show_camera_img(image_data)
        if ai.is_ai_data_updated():
            data = ai.get_ai_data()
            if data['code_data']:
                print(f"QR Code: {data['code_data']}")
            else:
                print("No QR code detected")

        time.sleep_ms(1)

except KeyboardInterrupt:
    print("\n捕获到 Ctrl+C 中断!")
    #screen.deinit()
    ai.deinit_ai()
猫脸检测
import ai
import time
from unihiker_k10 import screen
import machine

#初始化ai
ai.init_ai()

#启动摄像头
ai.camera_start()

#启动猫脸检测
ai.cat_detect()

screen.init()

try:
    while True:
        image_data = ai.camera_capture()
        screen.show_camera_img(image_data)
        if ai.is_ai_data_updated():
            data = ai.get_ai_data()
            print(f"Cat: {data['cat_flag']}")
            if data['cat_flag']:
                print(f"Cat Detect: {data['cat_detect']['frame_length']}")
                print(f"Cat Detect: {data['cat_detect']['frame_width']}")

        time.sleep_ms(1)

except KeyboardInterrupt:
    print("\n捕获到 Ctrl+C 中断!")
    #screen.deinit()
    ai.deinit_ai()
人脸识别
import ai
import time
from unihiker_k10 import screen
import machine

from unihiker_k10 import button
bt_a=button(button.a)#初始化板载按键传感器 A
bt_b=button(button.b)#初始化板载按键传感器 B

#初始化ai
ai.init_ai()

#启动摄像头
ai.camera_start()

#启动人脸识别
ai.face_recognize_start()

screen.init()

#当按键(A/B)(按下)
def button_a_pressed ():
    print("button_a_pressed")
    ai.register_face()

def button_b_pressed():
    print("button_b_pressed")
    ai.recognize_face()

bt_a.event_pressed = button_a_pressed
bt_b.event_pressed = button_b_pressed

try:
    while True:
        image_data = ai.camera_capture()
        screen.show_camera_img(image_data)
        if ai.is_ai_data_updated():
            data = ai.get_ai_data()
            print(f"Face: {data['face_flag']}")
            if data['face_flag']:
                print(f"Face ID: {data['face_detect']['face_id']}")
                print(f"Left eye: {data['face_detect']['left_eye']}")

        time.sleep_ms(1)

except KeyboardInterrupt:
    print("\n捕获到 Ctrl+C 中断!")
    #screen.deinit()
    ai.deinit_ai()
外部硬件
舵机
from unihiker_k10 import servo
import time
s1=servo(1) # 将舵机连接到P1引脚
while True:
    s1.angle(value=170) #设置舵机转动到 180°位置,角度范围为:0~180°
    time.sleep(1)
    s1.angle(value=10)
    time.sleep(1)
RGB灯带
from unihiker_k10 import neopixel
ws2812=neopixel(0,3) #将灯带连接到 1 号引脚,数量3
ws2812.brightness(9)#设置亮度0-9

ws2812.write(0,1,0x00,0x00,0xFF) #让 0-2 号灯珠根据 r、g、b 值显示色彩
DHT11/DHT22温湿度
from unihiker_k10 import dht
import time

dhtsensor=dht(0)#初始化连接在 0 号口上的DHT传感器,能自动识别11还是22
while True:
    temp,hum=dhtsensor.read()
    print(temp)
    print(hum)
    time.sleep(1)
DS18B20
from unihiker_k10 import ds18b20
import time
ds=ds18b20(1)
while True:
    temp=ds.read()
    print(temp)
    time.sleep(1)
超声波
from unihiker_k10 import ultrasonic
import time
sonic=ultrasonic(trig=0,echo=0) #连接 trig 和 echo 引脚,填一样的引脚时用的是SEN0388
while True:
    print(sonic.distance())
    time.sleep(0.1)
重量传感器KIT0176
from unihiker_k10 import force
import time
fs=force()
fs.zero() #清零
while True:
    print(fs.read(mass=False)) #返回质量值,单位为克。#默认返回质量,当参数mass=False时,返回力的单位N(牛顿)
    time.sleep(0.5)
GPIO
注:除板载P0/P1外,其余GPIO是通过I2C转GPIO芯片外接。只有基础的GPIO拉高/拉低功能
from unihiker_k10 import pin
import time

p0=pin(0)
p1=pin(1)

p2 = pin(2)
p2.write_digital(0)
p2.write_digital(1)


while True:
    print('read_digital:'+ str(p0.read_digital()))
    time.sleep(1)
    print('read_analog:'+ str(p0.read_analog()))
    time.sleep(1)
    print('write_digital_1')
    p0.write_digital(value=1)
    time.sleep(1)
    print('write_digital_0')
    p0.write_digital(value=0)
    time.sleep(1)

    print('write_analog(value=0,freq=255)')
    p1.write_analog(value=0,freq=255)
    time.sleep(1)
    print('write_analog(value=500,freq=255)')
    p1.write_analog(value=500,freq=255)
    time.sleep(1)
    print('write_analog(value=1000,freq=255)')
    p1.write_analog(value=1000,freq=255)
    time.sleep(1)